
Aradani Silicone Elf ears and Appliances
(updated 10-7-2016)
Our silicone appliances are a single pour of silicone (Dragonskin FX Pro or Ecoflex30). We cast it in your default flesh tone, but often you will need to touch up the color a little. Please see our “Painting Silicone” section.
Application:
- Clean skin and appliance with isopropyl alcohol
- Brush a thin layer of Pros-aide on both the skin and the back of the appliance
- Allow to fully dry (Pros-aide will become completely clear)
- Attach appliance or elf ear but gently putting the two tacky surfaces together. Pros-aide Acts like a contact cement.
- Pros-Aide cream can be used to blend the edges.
- Lightly powder the area to remove any tackiness.
- Paint.
Removal
- Slowly peel the appliance off, using Pros-aide remover to help gently remove.
- Clean the appliance and store in a plastic bag.
Older Information about Silicone Application**
**We now recommend applying with Pros-aide, as shown in the section above.
All of our silicone appliances are made from Smooth On brand Dragonskin Silicone or Ecoflex 30. To apply the prosthetics we use Smooth On brand Skin Tite Silicone Adhesive or a Pro grade medical adhesive.
Read more about Skin Tite at Smoothon.com.
Read the Technical FAQ at Smoothon.com concerning Skin Tite. (.pdf)
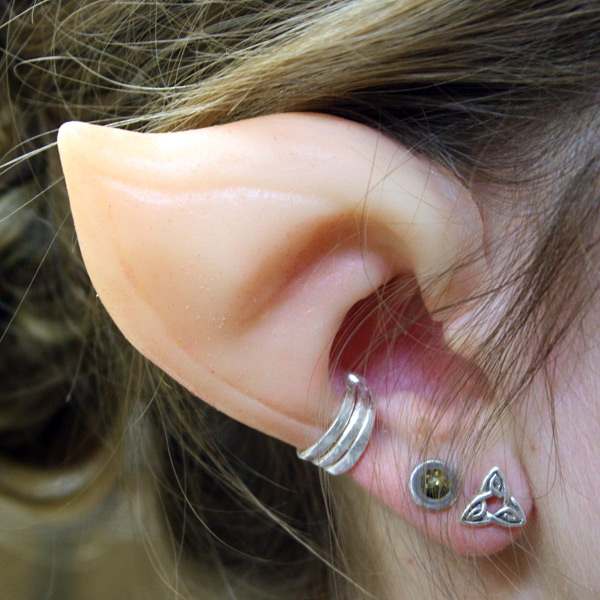
Our silicone elf ears are a single pour of silicone. We cast it is a default flesh tone, but often you will need to touch up the color a little. Please see our “Painting Silicone” section.
Application:
Clean application area with isopropyl alcohol.
Mix Skin Tite for 30 seconds.
Apply to inside of prosthetic.
Once appliance is firmly in place, a small amount of Skin Tite is mixed up and used to blend in the edges.
Lightly Power appliance and surrounding area.
Use makeup to blend in.
Why use silicone? Because unlike slip cast latex, silicone is very flexible. Why use silicone over foam latex? Because it is completely reusable and quite a bit more durable, as well as easy to repair. The only drawback to silicone is its cost.
Watch the demo of Paul wearing our silicone eyeless half mask:
How to paint silicone appliances.
There are a variety of ways to paint silicone prosthetics. Some work better than others, and others are a little easier though less permanent. We cast all of our appliances in a basic color for each mask. For example, people often want our Silicone Cat mask cast in blue to be used a Navi from Avatar. We can also cast anything in any color, just send us an email and we can do it.
On some of our masks, I paint in some basic details. On our Face Surgeon Mask, I paint in the lips a basic red and eyebrows in brown. These are often just the basic colors, and will need to be touched up with more make-up before you wear them.
Types of paint / make-up
I have used RMG (rubber mask grease) paint before with good results, but one of the problems is that it will never soak into the silicone and so if you brush your hand against it you risk smearing the make-up.
I paint the basic colors on with a mixture of Smooth on Silc pig pigment, Psycho paint, and Toluene. Toluene is a very smelly and hazardous to skin, lungs and eyes. So I only recommend it if you have a large room to work in and have used chemicals like this before. The smooth on products can also be diluted with Naptha or Xylene.
What most people use for silicone prosthetics and to blend in with the skin is an alcohol activated make-up. I have not used this yet, but I plan to in the upcoming months. I will update the tutorial as I experiment with these paints.
How to blend in:
Silicone prosthetics are not attachable using spirit gum. We offer 2 adhesives, Skin Tite and Pros Aide. We recommend Pros Aide over Skin Tite, as Skin Tite requires more prep work, and even with a good cleaning of the skin with alcohol, sometimes it just doesn’t cure because of a reaction with your skin. Pros Aide bonds, and bonds well. Just make sure that you also have a bottle of the Pros Aide Remover as well.
Here is a video showing how to make a basic scar and how to adhere it with Skin Tite.
The hardest part is blending in the seams. We do our best here to have a nice thin seam, but sometimes there are small imperfections that need to be fixed. You can blend it in by mixing up some silicone bondo with Tkin Tite and an additive called Thi-vex, available at Smooth on. After you mix it with Thi-vex it will cause it to be quite thick and can be placed in the seam area. Then using a small brush and some 99% isopropyl alcohol (it can be purchased at some supermarkets and most drug stores) you can blend out the seams. See the following video from smooth on which shows start to finish how to make scars, but the same technique can be used to blend out seams.
It is also possible to blend in the seams using Pros Aide Cream.
For more ideas, please visit our other tutorials. If you have any suggestions or questions, please email sales@aradanicostumes.com .