
Ash vs Evil Dead chainsaw prop
So I have been excitedly watching season 2 of Ash vs Evil Dead. A gentleman commissioned me to make the new boomstick harness from the show for Dragon*Con 2016. That inspired me to update my Ash costume from the Army of Darkness style costume to the new Starz Ash vs Evil Dead version. I needed something flashy, something new to add to my Ash costume. Mike is currently sculpting up our own version of the Necronomicon (to be posted soon), so I decided it was time to make the chainsaw prop!
The Jumping Off Point
In the show, Ash uses an altered Homelite XL chainsaw. You can find vintage ones on eBay for about $50-100 (at least at the time of writing this article). There were a few reasons that I decided against this route. One, hollowing out a real chainsaw seemed like a massive endeavor. Second, I decided a prop chainsaw wouldn’t cause as many problems with security at conventions. So this tutorial balances movie accuracy with easy of construction, weight, and security concerns.
Most chainsaw toys are atrocious. They are either flat and fake looking, or bulky plastic monstrosities. But then I found this Animated Chainsaw with sound (it was sold at Party City, but they don’t exist any longer). It is also listed on Amazon, but the reviews say the picture is inaccurate plus it is more expensive than Party City. And I even found a coupon around Halloween and got it for around $25!
Anyway, this chainsaw prop provides a great start. The soft plastic “chain” moves at a decent speed when you push the button. Being soft, there are no worries about hurting someone accidentally when moving through a crowd. The toy also revs and makes sound (not wonderfully loud sounds, but good enough).
The toy still has its flaws, such as the lazy splatter effect on the blade. But since we need to paint the entire toy anyway to get it to match Ash vs Evil Dead, it doesn’t really matter that much anyway.
Alright, so we have our base, let’s see what all we need to convert this chainsaw into an epic prop!
The List
Tools needed:
Dremel with various bits
Soldering equipment, and electrical tools
Hot glue gun
Files and sandpaper
Phillips head screwdrivers, large and small
Flat head screwdriver
Needle nose Pliers
Sandpaper
Vice*
Rubber mallet*
Table Saw or Band Saw*
Tin Snips*
Other items needed:
P3 black primer spray paint
Red spray paint
Bicycle grip
Wooden dowel to fit inside bike grip
Model Magic, black
Blue painter’s tape
Wooden Axe handle or 1 inch wooden dowel*
Simpson 20-gauge metal strap*
*Items marked are only needed if you wish to continue with Phase 3 onward.
Step by Step
Phase 1: The Guts
This section is all about working with the interior of the chainsaw prop.
- Dremel off the silver handle on the back, so that back side is flat. Don’t worry if you accidentally cut or damage a wire during this step, we will solder extensions on most of the wires shortly. Also, for this tutorial we will be reusing the black tactile switch, so cut the two wires leaving a few inches attached to the switch, and set it aside.
- Dremel a rounded hole on the exposed back. You want to make sure it is large enough for your hand to slide in comfortably. Using files and sandpaper, smooth the edges of the hole. I did about a 2.5 inch diameter circle.
- Open up the chainsaw body. I tried working within the cavity of the chainsaw for hours without opening it. It is difficult and annoying (one of the wires popped off of the circuit board, so I had to open it up anyway). There are 5 screws holding the body together. They are stubborn, but removable. It is definitely 100% worth opening up the body. Once separated, you can only twist it so much because of the silver handle. So…
- Remove the silver handle. Once you have the body split in half, there is a small corner flap holding one end of the silver handle in place (exterior of the prop, near the blade). This should rock forward toward the blade and reveal a screw. Remove the screw. There is also a large silver pin that you will need a thin metal rod to push slightly out, then you should be able to grab it with a pair of needle nose pliers and slide out. To remove the other end, you will need to depress two tabs using a flat head screwdriver. Press in one, rotate the handle, and press in the second, and you can remove the silver handle.
- Reinforce solder joints and extend all the wires. Unless you are very adept at soldering onto small circuit boards, be very careful with the connections inside the chainsaw, they are very fragile. I ended up using my hot glue gun to completely encase every solder joint at the circuit board, speaker, and motor. Hot glue is not conductive, and it gives you extra security at these weak points. I also extended every wire within the case. I cut them, stripped the ends, and soldered an 8-10 inch extension to each and every wire. This allows you to position them out of the way so that you don’t need to worry about them when your hand is inside the prop.
- Remove the On/Off switch and red button. The little black tactile switch bypasses the on/off switch since it is a demo button. So there is no need for the on/off switch or any of the wires running to the red button. I cut all those wires, taped the ends and unscrewed the on/off switch from the body. I kept it with my electronics stuff, no reason to toss out a perfectly good switch!
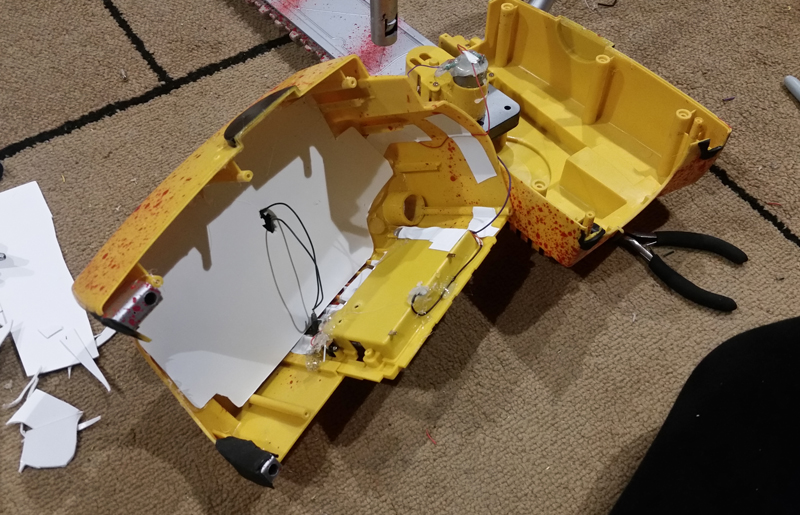
Foamboard in place. At this time, I hadn’t removed the silver handle or the on/off switch. - Tape down all wires and seal off circuit board and speaker. Even though no one will see the inside of the prop, I wanted it to look professional. I also didn’t want to accidentally pop off a wire while wielding the prop. I have had too many “oh crap” moments at Dragon*Con when a prop fails cause I didn’t secure the electronics. Taping down all wires down to the chainsaw body, I then cut out a piece of thin foamboard that contoured to the left side of the saw and hot glued that in place. This board protects and conceals almost all the wires in the prop, as well as the circuit board. I taped the wires down pretty securely, but more importantly, wanted to protect the circuit board from my clumsy hands. I have secured every wire now except for the 2 green wires leading to the black tactile switch. After taking the above photo, I used electrical tape to bind those 2 wires together to secure them as well.
- Mount a comfortable handle grip.
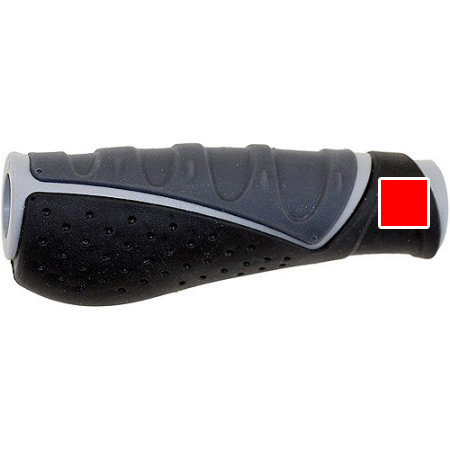 My first handle was a largish, wooden dowel. I wanted something sturdy that fit my hand well. But after playing with it for a bit, I realized they make ergonomic bicycle grips that are much better. I purchased a 7/8 inch dowel and ran that through the grip. It is rather difficult to squeeze a bicycle grip onto a wooden dowel, but it is necessary for a tight fit to avoid the bicycle handle rotating around the dowel inside of the prop. Once mounted, use a razor to carefully cut a square hole near the top of the grip for the tactile switch, inset about 1/2 inch from the edge of the handle. Be careful not to cut too closely to the edge of the grip, you want to make sure the top is still a solid ring.
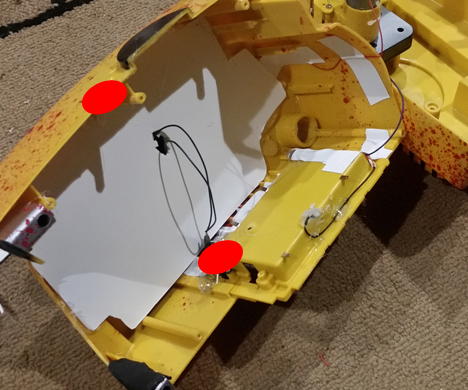 Next, cut the dowel to the correct length. My handle sits atop the back corner of the battery compartment and the top of the handle is just behind the top, center screw post (see image to the right for approximate placement).
I then ran wires down through the top and out the hole (red square), soldered them back onto the tactile switch, and epoxied the switch onto the dowel.
I positioned it so that when I grip the handle, the button is up out of the way. But with a simple flick of your thumb up, you can easily control the sound and motion.
When mounting the handle, drill pilot holes to prevent the plastic from cracking, and then shoot 4 screws total (2 on the top and 2 on the bottom). You need more than 1 screw on each end to prevent the handle from rotating. - Close it up! We should be done with the electronics and handle now. Carefully lock the 2 halves together, and put the 5 screws back. Don’t worry about the silver handle, we have to paint that before reattaching it.
Phase 2: Making her pretty
This section is all about the exterior: painting and modifications
- Primer the chainsaw.
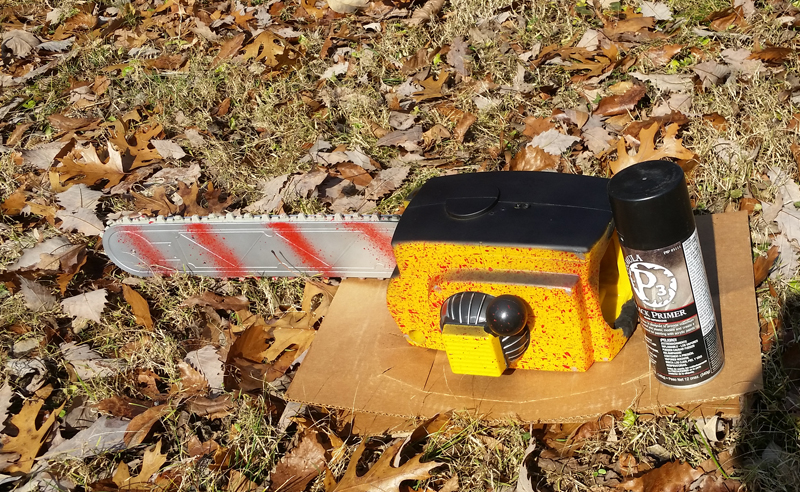 I prefer to use Privateer Press P3 flat black primer. It is very expensive spray paint, but I can attest that it works wonderfully (it even bonds decently to PVC!). After 2 coats (fully dried), I scratched at it with my fingernail. It left faint marks on the surface, but the paint did not come off.
 - Tape off the non-red areas of the chainsaw. Using painter’s tape and scrap paper, cover up anything that you don’t want painted red. I thought about using regular model paint with a brush, but that would take way too long, take more coats than I was willing to admit, and most likely leave brush marks. So model spray paint it is. The one I settled with is Testor’s One Coat, as I wanted a metallic sheen, so I choose the Lacquer paint over the Enamel paint. Revving Red is a great color.
- Painting certain areas silver. Using silver paint, paint some of the areas that are flat black right now. This includes the “gas compartment” on the back right corner, the grill near the pull cord, and the chain and bar. Put on a pair of disposable gloves, and use the silver Rub-n-Buff to create a nice weathered look to the silver areas. Please note: Rub-n-Buff is wax based and is difficult to remove from the red and black parts of the prop. It also doesn’t always dry 100%. Maybe silver model paint would be better.
- Mounting the arm guard. Now that the body is painted, let’s mount the arm guard.
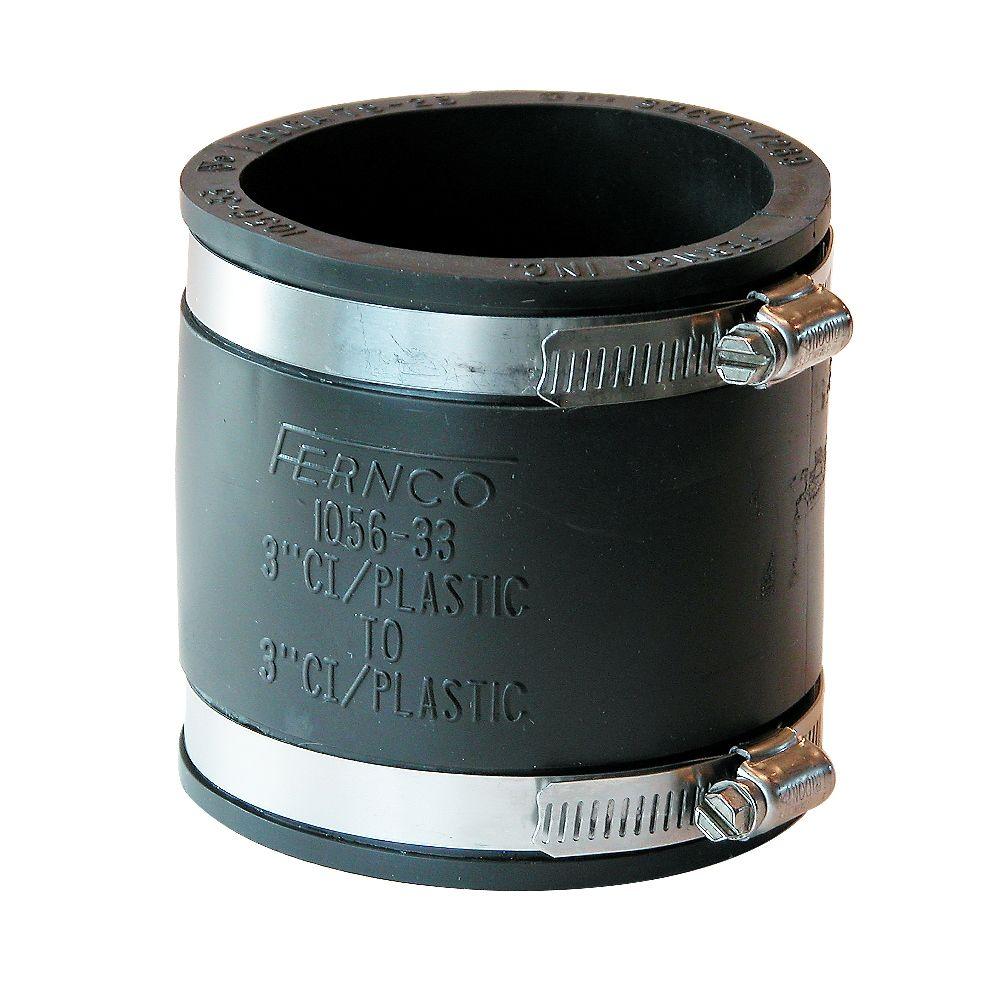 I went with this coupling from Home Depot. In the movies, they used a T Clamp from an automotive store wrapped around some sort of PVC or metal tubing. I decided that this soft, rubber coupling would be more comfortable against my wrist. Using 2 part epoxy to glue the coupling to the chainsaw body, I then used Magic Sculpt to fill any gaps between the body and the arm guard.
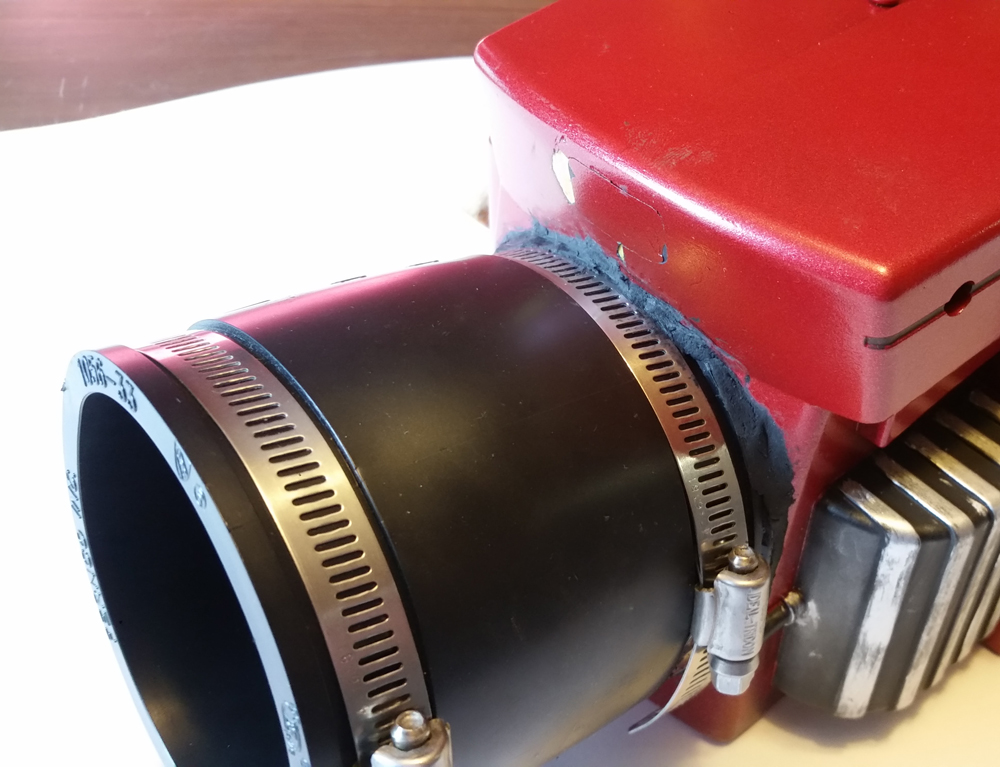
Finished arm guard showing the Magic Sculpt, which is covering the epoxy layer underneath. - Mounting the Pull string.
 The cord pull on the toy is a weird, black sphere. That has to go. I simply sawed off the offending part, and filled in the revealed opening with Magic Sculpt. Using a section of the 7/8 inch dowel left over from phase 1, step 8 to make the new pull handle, I stained it with a light stain. Once dried, I drilled some openings into the handle, like pictured to the right. The larger green hole was for the faux rope. The narrower teal hole was a pilot hole for the screw, and the screw is in pink. This screw is then epoxied into the Magic Sculpt. Finally knot a thin nylon or cotton rope and epoxy it into the larger drill hole (bright green).
 - Remount the silver… now black, handle. So at this point, all you need to do to have a fully functioning Ash vs Evil Dead chainsaw prop is to remount the black handle removed in phase 1, step 4. However, if you want to have a more accurate movie prop, you can keep going with me, skip this step for now, and move on to phase 3. If not, simply reverse the procedure for removing the handle to remount it.
Phase 3: Going the extra mile
This section is all about some additional steps to make the chainsaw prop look more like Ash vs Evil Dead or Evil Dead 2.
- Reworking the handles: First, the top handle. So the main thing that is missing right now is the metal and wooden handle that runs along the top spine of the chainsaw.
 I purchased a 1 inch wide strip of aluminum from Home Depot. I chose aluminum over steel for a few reasons. Looking at the actual movie prop, I think they used aluminum in the original chainsaw prop. Second, the only tool required to bend an aluminum bar is a vice and a rubber mallet. Before each bend, verify the length for the next bend, slide slide it into the vice, and simply pull on the longer end of the bar to bend the aluminum into shape (or bop it with the mallet). A new ax handle, ripped down the middle, makes a perfect wooden handle. Once ripped, it requires minimal sanding to achieve the desired shape.
After taping the wooden handles into place on the metal bar, I then carefully drilled the 2 holes for the mounting nuts and bolts. Once the nuts and bolts are tightened to the metal bar, you can remove the painter’s tape.
Drill a few pilot holes into the bottom metal bends of the handle. Mark those holes on the toy, and drill pilot holes in the prop. Thankfully, the bolt heads on the on interior of the prop, and the nuts on the exterior, this makes it much easier to bolt it into place. Please note: You want to avoid shooting screws directly into the center seam line of the toy. Make sure to drill your pilot holes off center on the metal handle. - Reworking the handles: Second, the black side handle. So on the original toy, the handle connects from the lower left corner up to the upper right corner by the blade. But after mounting the upper handle in step 1, there wasn’t much room to remount it as it was. Plus, it isn’t show accurate.
We are going to fill in the hole near the blade with Magic Sculpt (the one with the screw and the long metal pin), and use 2 part epoxy in the lower left hole so that the new shortened handle is securely in place. Without this epoxy, the black handle could rotate because of the way it slides and locks in place. Lastly, I used some Magic Sculpt to create a rounded end of the newly floating end of the handle. A little sandpaper will smooth into a nice spherical shape. - Banding between the arm guard and chainsaw body. To create the small metal strips the bind the arm guard to the chainsaw body, I purchased a Simpson 20-gauge strap from Home Depot. This is thin enough that you can cut it into strips using a good pair of Tin Snips. I trimmed made about five strips total, approximately 1/2″ by 2-3.” I filed the edges to smooth them, and drilled pilot holes near both ends. I then used my vice and rubber mallet to form these to better contour to the body of the chainsaw.

Just like the silver handle above, the bolt heads are on the interior of the chainsaw body and arm guard, with the bolts on the exterior. Slide them in place, and use a short Philips head screwdriver as you tighten the bolts with a socket or pliers. - The Gas and Chain Oil caps. The final step of this Phase is to mount the 2 caps along the front-left of the top of the chainsaw, one for the Chain Oil, the other for the Fuel/Oil Mix. One cap is red, and the other is black. Depending on if you are going for Evil Dead 2 or Ash vs Evil Dead, the color of these caps are reversed. On both props, the Fuel cap is closest to the front, but it is black in Evil Dead 2, and red in Ash vs Evil Dead (there is a continuity error in the pilot when Pablo kicks the chainsaw to Ash. The CG chainsaw that flies through the air has the Evil Dead coloring).
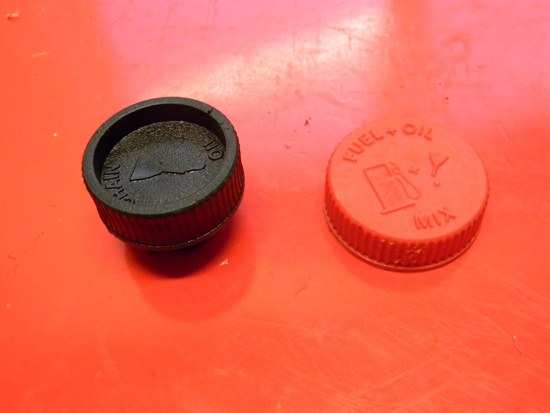
Homelite 330 caps There were 2 ways that I considered to make the fuel caps. At first I just took a red Coca-Cola cap and a random black soda cap, and mounted those on. But after all my effort, I wanted something better. I purchased a set of chainsaw caps on eBay, only to find the fuel cap was too large. I then ordered a second set of caps (pictured to the left), and these were the “ones.” Using some nuts, bolts, and my trusty 2 Part Epoxy, they were mounted and ready to go.
Phase 4: Making her un-pretty
This section is about making the chainsaw look used and gory, the special effects portion of the project.
- Guts and oil. So sadly, we are onto what I consider the saddest part of prop making. After all of the hard work to make this nice, beautiful prop, to truly make it worthwhile, you have to make it ugly. I sanded a few spots of Revvin Red along the edges, and painted thin silver lines to imitate scratched off paint, revealing the metal underneath. I used Mike’s method for antiquing and creating the appearance on bone on his various Skull props. Using Minwax’s Water Based Wiping Stain, in Onyx, I mixed some stain with sawdust to create an oily, gross, gory-bits paste that I used to wipe onto the saw. To be honest, the consistency freaked me out a little, it was almost that or a top car wax and I feared it might not do. While I dabbed a bit here and there all over the saw, I applied it heavily to the front of the prop where the blade meets the body, along inside corners and crevices, and around the 2 caps. I used more saw dust in places where there would be more Deadite bits (near the blade), and less where it is more chainsaw muck than fleshy chunks (along the caps).
- Blood. I found another tutorial that talked about using Mr. Hobby Clear Red H90 for a good translucent blood effect. I have ordered the paint, and will update the tutorial with the final step once it is complete.
So the paint arrived, and I do not recommend it. While it does a good job for the splatter effect, the paint is very odd. It says that it is a Water Based Acrylic, however, it also has two warnings on the bottle, Hazardous and Flammable! I am not sure how a water based paint can be flammable, but yeah. After I applied the paint using a chip brush to sling the paint on the chainsaw, I tried to clean up.
Most water based paints that I am familiar with clean up easily with soap and water. Neither soap and water, nor mineral spirits would remove this paint from my hands!
I didn’t use this paint, but I have had much luck with Testor’s brand for this project, so I would probably go with this Testor’s Clear Red. Of course, the bottle in that image clearly states “Water Wash-up.” However, under the “requires” section, it says that it needs Testor’s Acrylic Cleaner. So you got me.
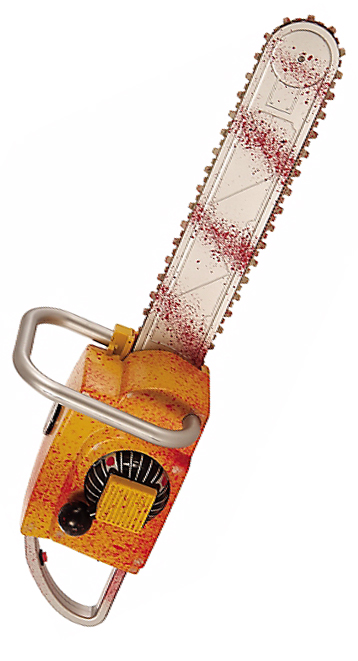
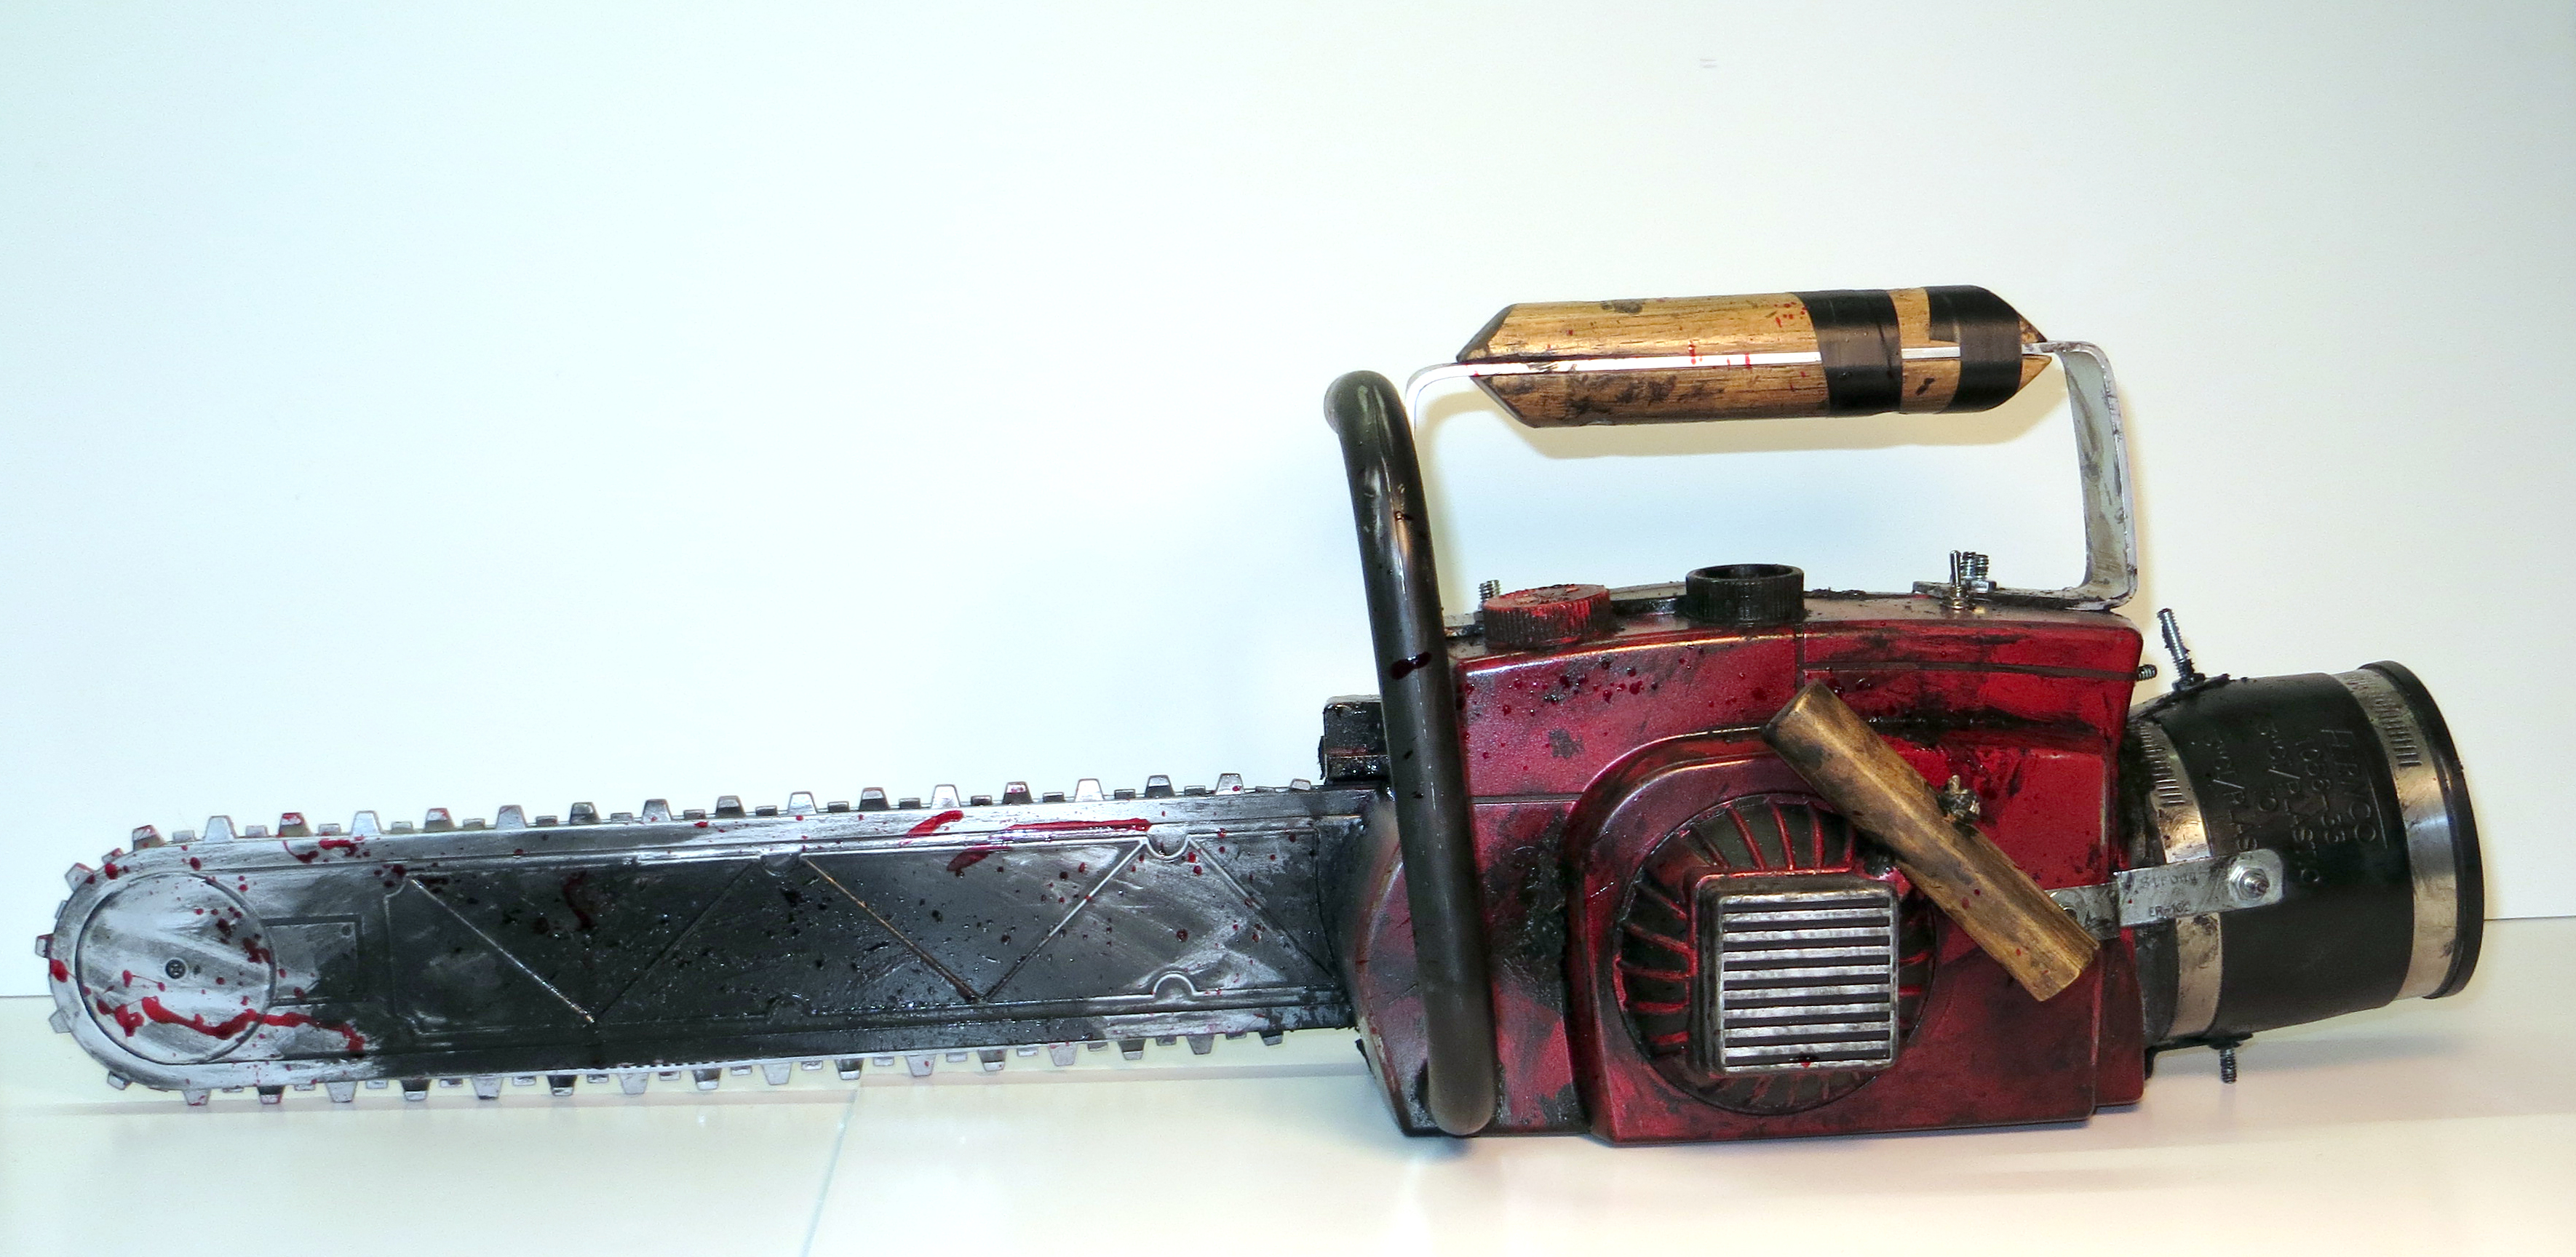
Finished Chain saw
And here she is, a photo of the finished project.
And the image from the movie/show. Actually, this is clearly the movie since the red and black caps are in the movie positions.
You can see in this close up that the caps are reversed for the show (and he added electrical tape to the wooden handle)
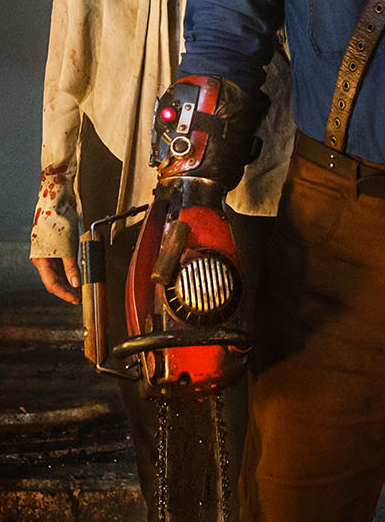
Except of course, when the chainsaw is CG in the Pilot.
