
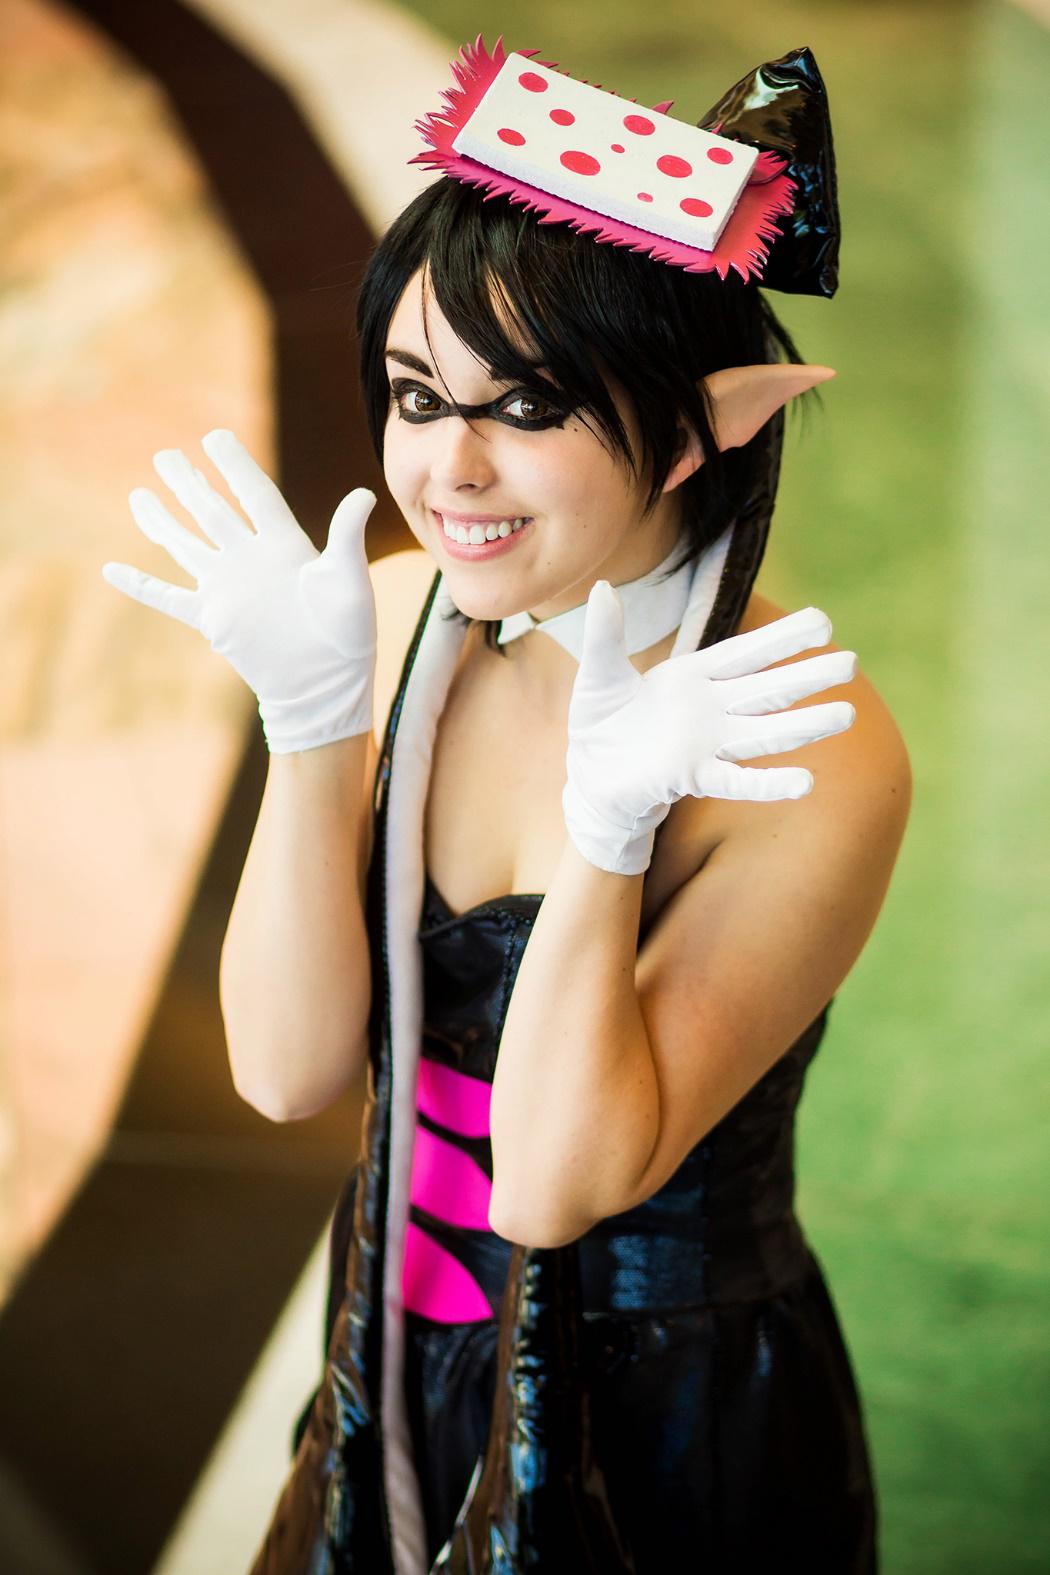
Hey everyone! This is Crazy 8 Cosplay here with a write-up on how I made my Callie cosplay from Splatoon! Some of the pieces I made are specific to Callie, but much of my process could be used to make any female Inkling, or even an original design. Let’s get started!
I wanted to cosplay Callie pretty much as soon as Splatoon was released. I was initially drawn to the Inkling designs but fell in love with the sparkly pop-star outfits of the Squid Sisters. Callie was my favorite of the two, and I thought it would be great fun to try and embody her peppy, upbeat personality! With that sentiment in mind, I got to work planning my cosplay of her.
Design
From the beginning, I knew I wanted to make my Callie cosplay as realistic as I could manage. I tried to imagine what an Inkling would look like in real life- they’re very cartoony and disproportionate, which can be difficult to capture in a cosplay. I knew I wanted the tentacles to have the wet-look shine that they do in the game, which can be achieved through the use of glossy 4-way stretch spandex. I considered trying to make a complete headpiece out of foam instead of a wig, as I’ve seen some other Splatoon cosplayers do, but it’s pretty hard to fit those correctly so they don’t look like a stiff helmet. In the end, I compromised with a fiber wig combined with wet-look spandex tentacles. I chose a shiny, metallic spandex for her romper and a matte pink spandex for her leggings as well.
Construction
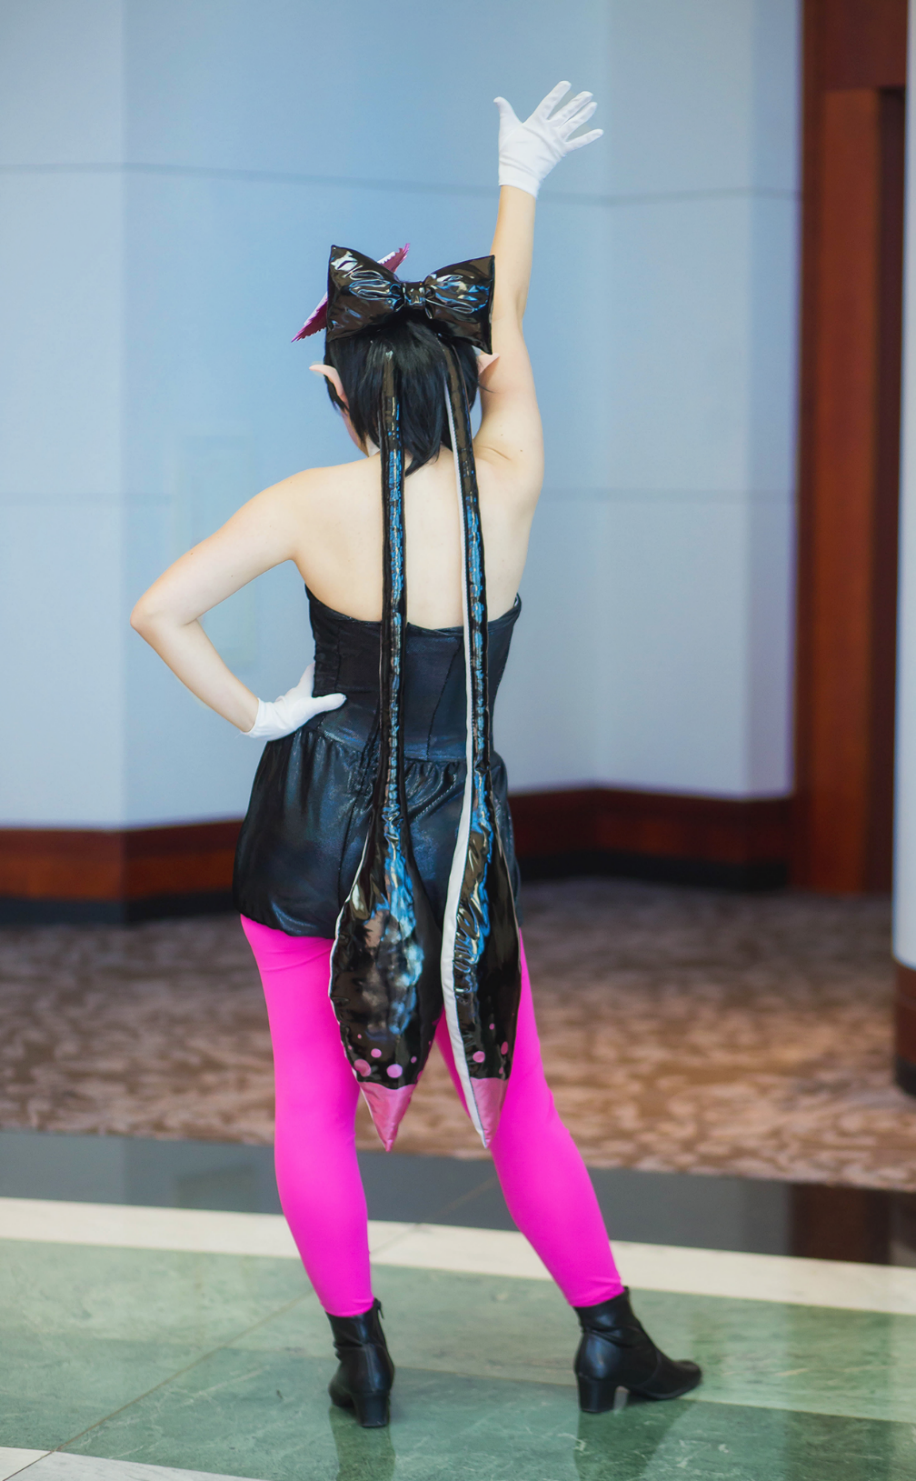
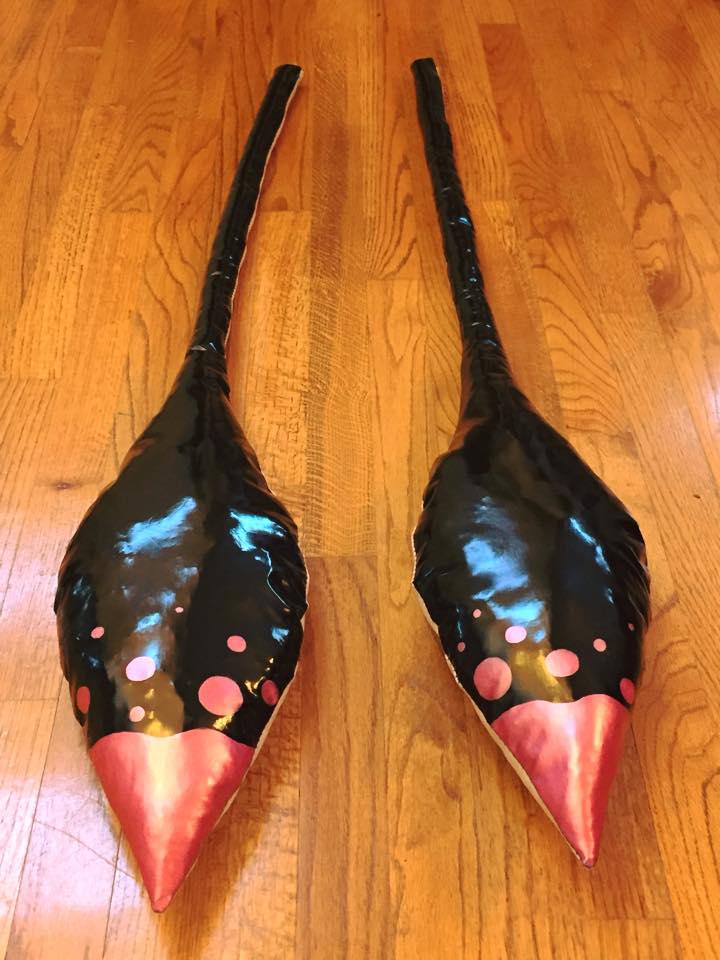
To create the tentacles, I first had to draw up a pattern. This took a bit of estimating- Callie’s tentacles reach to the level of her knees, and I wanted my version to be as close to that as possible, so I had to scale this to my own height. I’m 5’4”, and the tentacles ended up being about 44” long. I also created a pattern for her “hairbow”, which I made as a separate piece from the two tentacles.
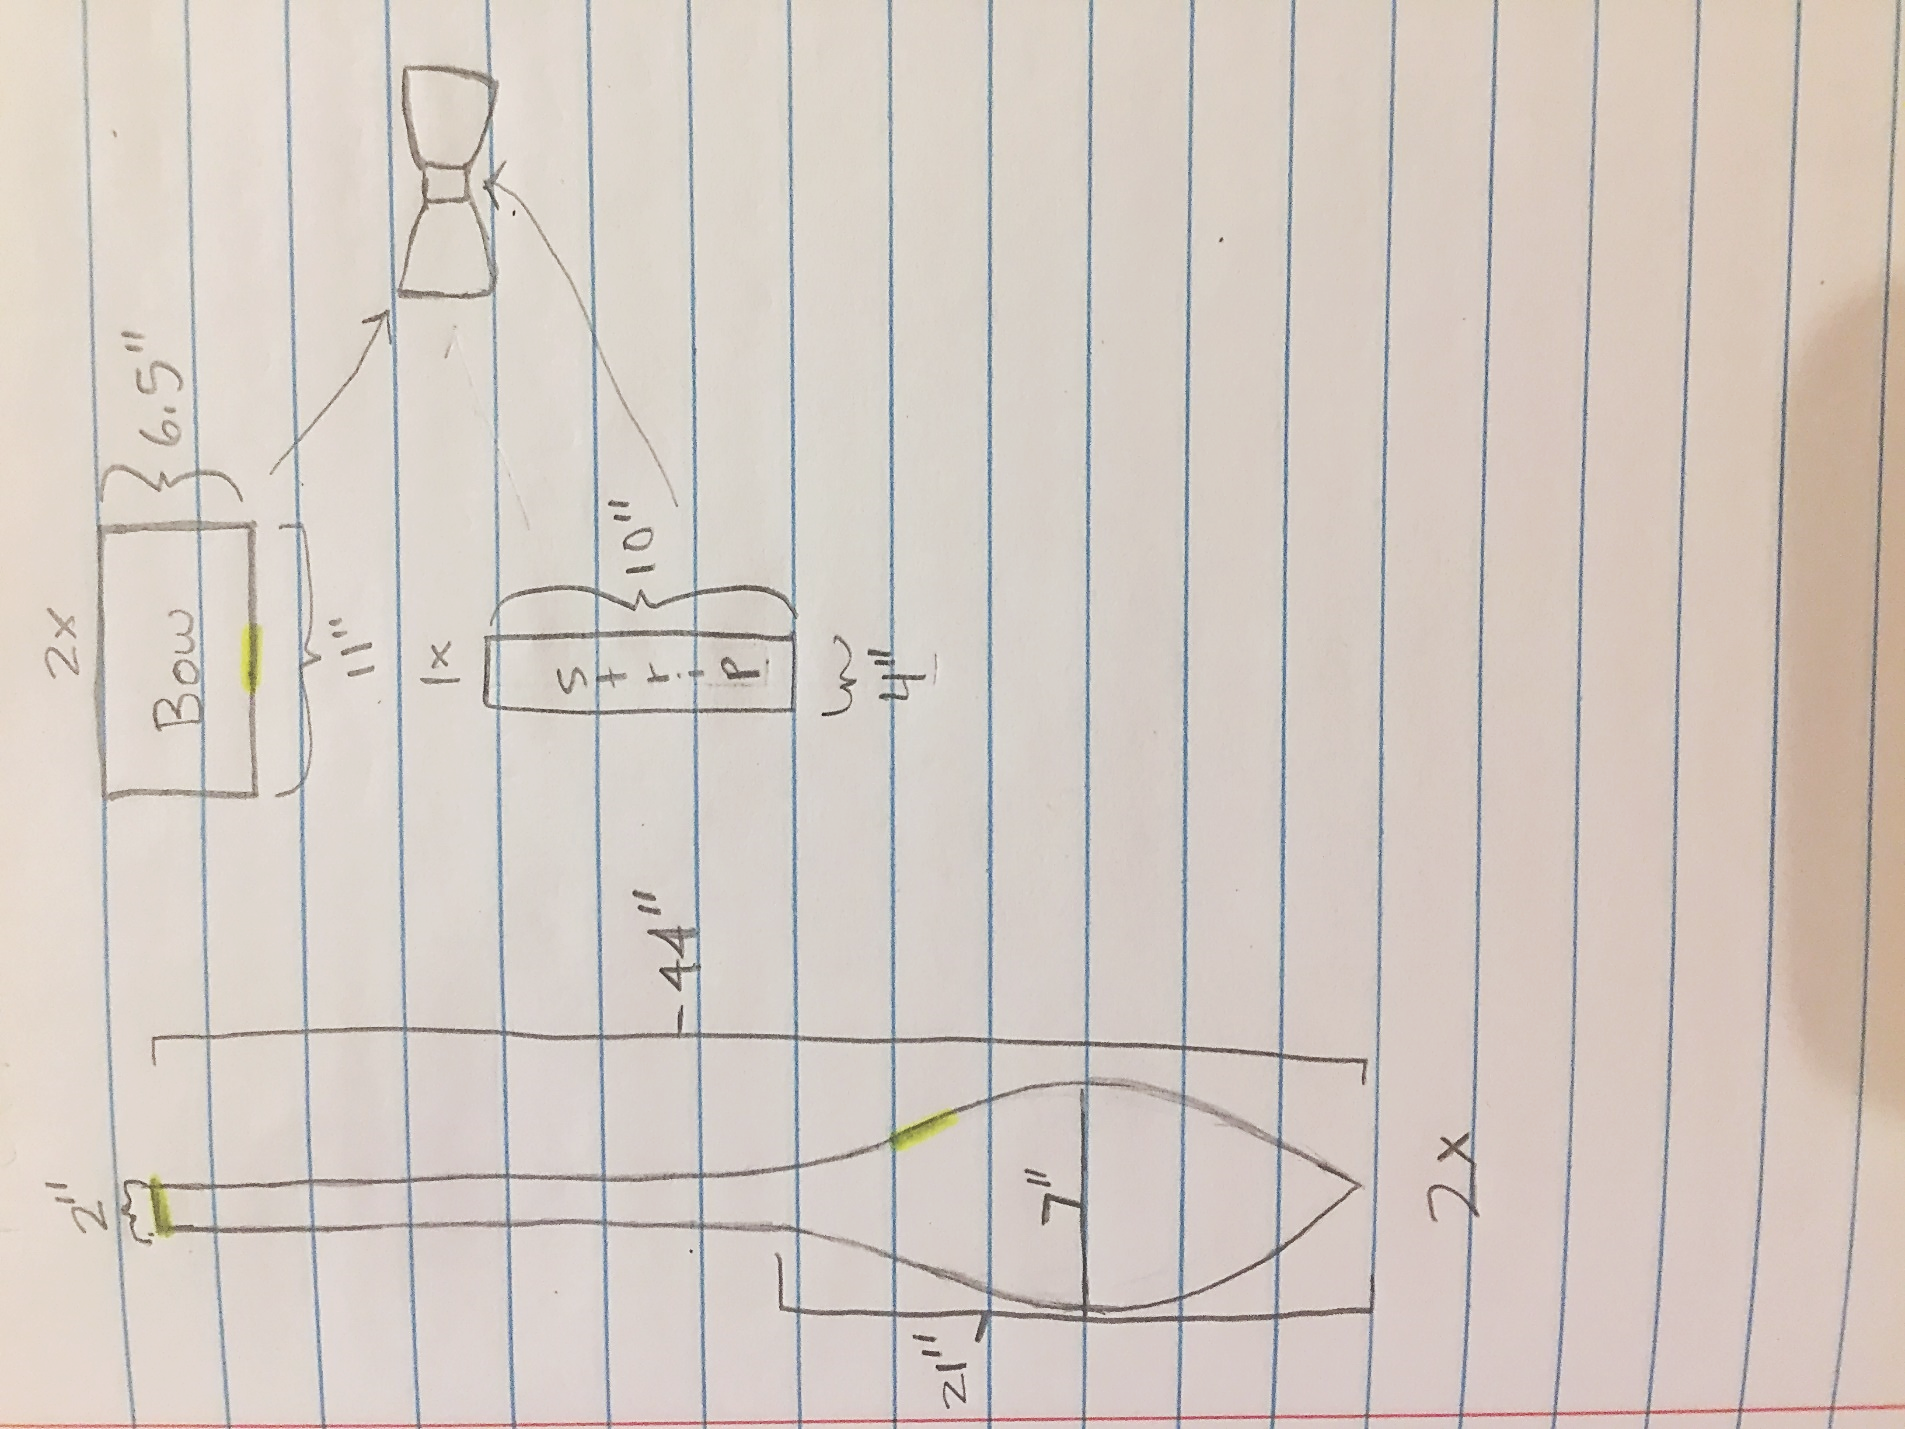
(The basic patterns and measurements for my set of tentacles- the yellow highlighted areas indicate where a gap should be left to slipstitch closed after stuffing the pieces)
I bought 4-way stretch glossy PVC fabric in black for the top part of the tentacles and a white pearlescent 4-way stretch fabric for the undersides. If you’re doing a different character, you can pick spandex fabrics in the colors that you need, so long as they’re both 4-way stretch (this will be important later, when it comes time to stuff them). The ones I picked came from the cosplay fabric lines at JoAnn Fabrics, so I was able to use a coupon to get them for cheap. I started off by cutting 2 tentacle pieces from the black PVC fabric and 2 from the white fabric, using the patterns I made and pinning them to the fabric. I also cut 2 rectangles for the main piece of the bow and one long strip for the “tied” part in the center. I paired each black tentacle piece with a piece in white, with the right sides together, and stitched them together, leaving a gap at the top of the tube and along the highlighted areas in the picture above, on the sides of the tentacle “clubs”. It’s important to leave this gap because we’ll be stuffing these tentacles later, and it will be much more difficult and time-consuming to stuff them from the tiny opening in the top than from the sides. As for the stitching, be sure to use a zig-zag stitch, which is included on most machines. This will allow the stitches to stretch with the fabric to a certain degree, which is very important when working with any kind of spandex or stretch fabric. If a straight stitch is used, the stitches will likely pop out if any kind of strain is applied to them. I also turned the right sides of the rectangular bow piece together and sewed them together, leaving a small space in the middle of one side to insert the stuffing. I turned the edges of the long strip piece over and sewed those under to hide the raw edges.
After stitching the pieces together, I clipped the edges and turned the pieces right-side out. I then got started with stuffing the tentacles and bow. Here, it’s important to keep the tentacles as lightweight as possible, since they were eventually going to be attached to my head. I used a mixture of poly-fill stuffing and plastic grocery bags (hey, it’s recycling!) to stuff the tentacles and bow. The plastic bags help to take up a lot of volume without adding significantly to the weight. It’s best to keep the poly-fill stuffing close to the surface of the tentacles so the outline of the plastic bags doesn’t show through. The 4-way stretch fabric will be able to accommodate the strain of stuffing in all directions. After stuffing the tentacles as full as I could get them, I used a slipstitch to close up the gap in the sides of the tentacle “clubs”. I finished stuffing the tubes from the small opening at the top, poking the stuffing down with a rod when necessary. I stuffed the rectangular bow in the same way, leaving a bit more space at the middle for the center strip to cinch the bow a bit and give it a nice shape. I slipstitched the opening shut, wrapped the strip around the middle, sewed the edges together to complete the loop, and flipped it over so the raw edges were concealed on the inside.
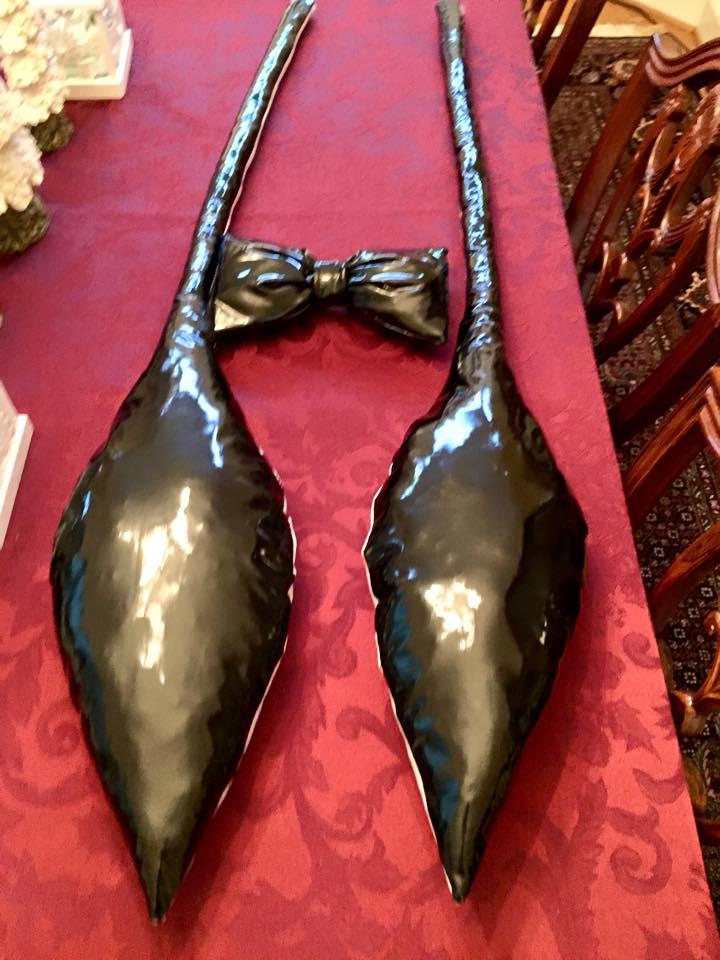
The structure of the tentacles and bow was complete! Before I could start decorating the tentacles with spots, I first needed to find a way to attach them. I folded the raw edges at the top of the tube over and sewed them down, sealing the tube. I decided to attach the tentacles with a pair of metal barrettes that I had on hand. I hand-sewed one barrette to the end of each tentacle, right where the edges had been turned over, making sure to sew through all the layers of material to ensure that the barrettes wouldn’t rip out through the fabric. This is where using a wig really came in handy. Wigs have rows of wefts, which are essentially lace or elastic with the hair strands sewn to them. The barrettes could be threaded under several rows of wefts and clipped securely to the wig, which was in turn secured to my head. I also hand-sewed an alligator clip to the bow to attach it higher up on the wig. When attaching the tentacles, I clip each one under the bow to conceal the fact that they are actually separate pieces. This makes them lighter, easier to transport and adjust, and a lot simpler to make!
After figuring out attachments, I got started with painting the pink spots onto Callie’s tentacles. I had considered using other methods- namely, applique- but I don’t think even a spandex-on-spandex applique would have given me the look I wanted. It would’ve been too complex to get all the spots on and looking right. The nice thing about the plasticine material I used is that you can pretty much paint right onto it, unlike most fabrics. I used a pink metallic acrylic paint; I didn’t even need a specialized fabric paint. After looking at a lot of reference photos, I started off by defining the outlines of the spots and solid pink area with a thin brush. I filled them out with one layer of paint and waited for it to dry. In total, I think I did about 3-4 layers of paint. Doing multiple layers is the best way to ensure an even, opaque coating. It stuck pretty well to the black spandex without any prep work. However, the paint can chip if you squish the tentacles up or subject them to heavier wear and tear. I’ve been storing mine on a shelf in my closet, and they’ve held up just fine after multiple uses. They’re even waterproof!
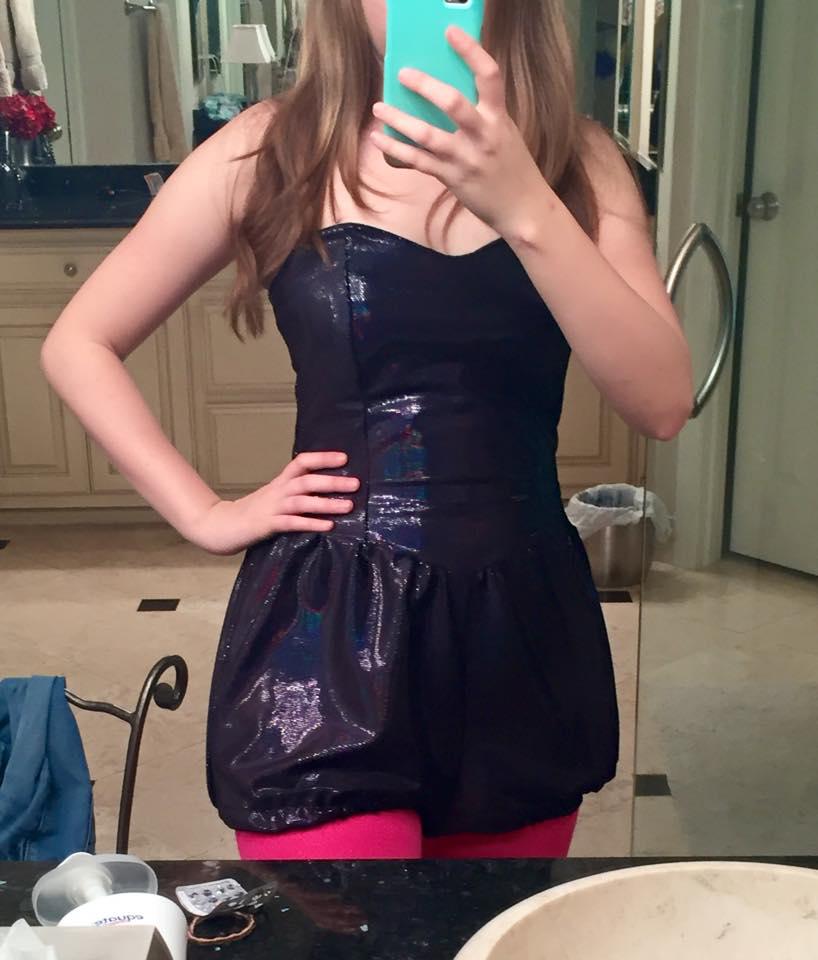
That’s it for the tentacles! To create the romper, I basically combined a strapless sweetheart-neckline bodice with baggy shorts with a seam around the hips and a zipper down the back. I then double-folded the bottom edge of the shorts over and hemmed it, leaving a hollow channel for elastic. I threaded elastic through the channel and sewed it closed to create a loop. With the elastic cinching the bottom of the shorts, the extra volume that had looked baggy without the elastic turned into the ‘poof’ that I’d been going for! The last thing the romper needed was the 3 sushi-style slits on the front. The game models make it look like the slits are actually cutouts in the romper, and the pink color comes from a layer worn below. However, I decided against this design choice in my costume, since game clothing doesn’t work like real clothing, and the cutouts would deform if I moved at all in the costume. Instead, I appliqued the pink slits on top of the black romper material. I used the same pink spandex that I had used for my leggings (which I made with a homemade pattern based off my own measurements). I first made a quick pattern for the slits, cut 3 out of the pink spandex, then cut out 3 corresponding pieces of Heat n’ Bond. Heat n’ Bond looks like iron-on interfacing and functions like glue: it sticks your fabric down to whatever other fabric piece you iron it onto and seals the edges. With the Heat n’ Bond, I was able to securely bond the 3 pink pieces onto the romper front. For most materials, I’d recommend satin-stitching the edges of your applique to ensure they don’t peel off or ravel, but spandex doesn’t ravel like other fabrics do.
Accessories
Now for the final touches! For Callie’s sushi-headpiece, I used EVA foam for the main spotted piece and a thinner craft foam for the pink piece underneath. I hot-glued another alligator clip to the bottom of it and clipped it to my wig (this costume involves a LOT of things attached to my head…). The gloves were bought, and I altered the collar off a dress shirt to create the neckpiece, which connects with a hidden hook-and-eye closure. I had used Aradani’s ears before for another costume, so they were the first company that came to mind when it came time to find some Inkling ears. After perusing their Etsy shop, I eventually settled on the Dusk Elf ears. They’re just the right shape for Inklings- large and pointy enough to stick out from the wig, but not so long as to look disproportionate. They ended up being the perfect accent to the costume! I used a pair of golden brown circle lenses (GEO Café Mimi in Macchiato) to give the impression of larger Inkling eyes and used a liquid black eyeliner to create the “mask” around my eyes.
And that’s it for Callie! I learned a lot from this costume about working with spandex and drafting my own patterns, as well as adapting a cartoony style to real life. Despite not always being the easiest to wear (again, lots of things on my head!), I always have a wonderful time chatting with other Splatoon fans and cosplayers as Callie. Thanks so much for reading this tutorial, and I hope it helps someone out there become the squid-kid of their dreams! Stay fresh!
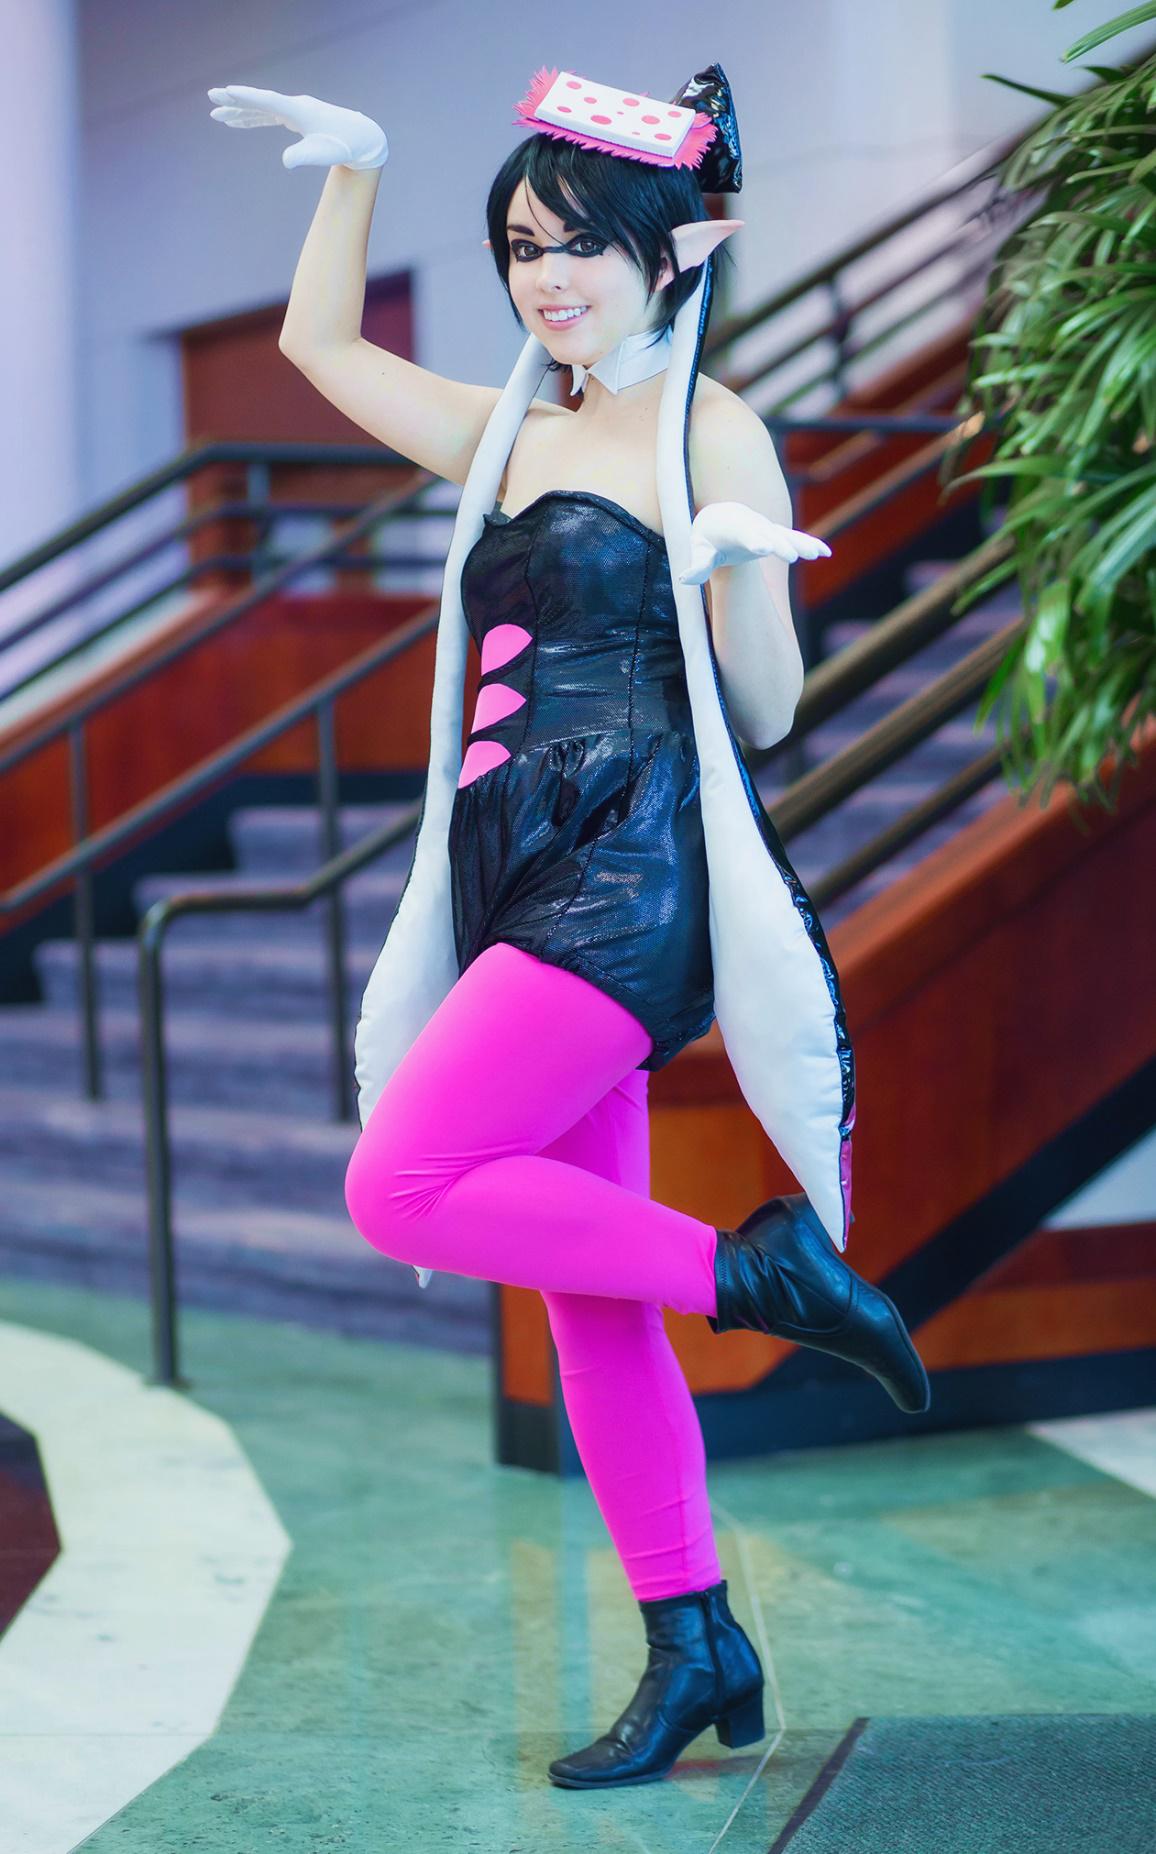
Photo credit: Ken AD Photography
Crazy 8 Cosplay