
So you ordered a disk holder and now you are wondering, what do I do with this?
If you ordered just the holder, you will need buy buy some high powered magnets, some sort of metal, and nuts and bolts. We have the option now to order magnets (between 5 and 10) as well as some strips of metal to line the inside of the holder. you will still need to purchase some nuts and bolts at a local hardware store. I recommend #10-24 2″.
As of March 11th, We will be pre-drilling all the holes so that there is no risk to the customer of breaking their disk holder while drilling.
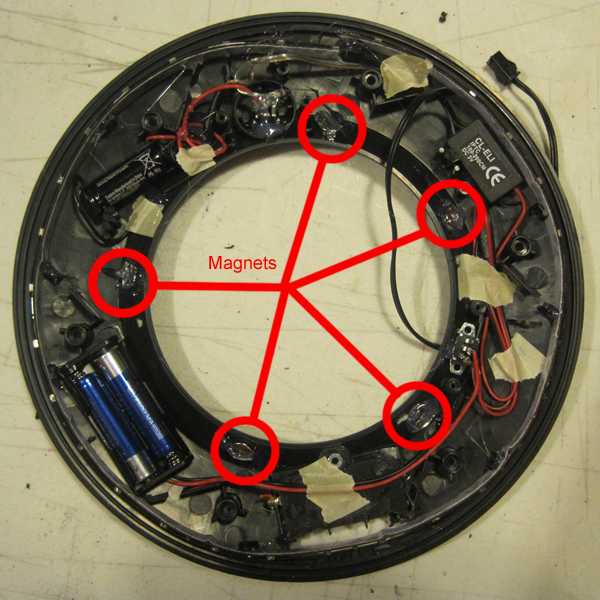
I glued the magnets inside my disk in a star pattern . I try to make sure that they are as evenly spaced as possible. Also make sure their polarity is all facing the same side. I put a small amount of super glue on each magnet and then hold it in place for 15 seconds. Then I run a bead of hot glue around and over the magnet to give it extra strength.
 .
.
If you are planning on wearing your disk out in a place where you will be moving around a lot, even getting jostled (DragonCon / San Diego Comic Con) I recommend going with the ten magnet set up. If you really want it to have a stron hold, you can put magnets on the inside of the disk and the holder. The one thing to keep in mind if you do this is that the magnets must line up perfectly. The first disk holder I had I put magnets on both sides but there were a little off and the polarity actually pushed my disk off the holder!
Adding the metal to your disk holder:
This is pretty simple, you want to break the metal ring up by bending it back in forth so it is in smaller 1.5″ sections. Then glue it to the inside of your disk holder. If you use hot glue make sure the metal is as close to the plastic as possible. The further away the metal is from the magnets the less pull there will be. Also the more material therer is between the metal and magnets the weaker it will be. I put the metal strips down on the plastic, then put the hot glue over top of it.
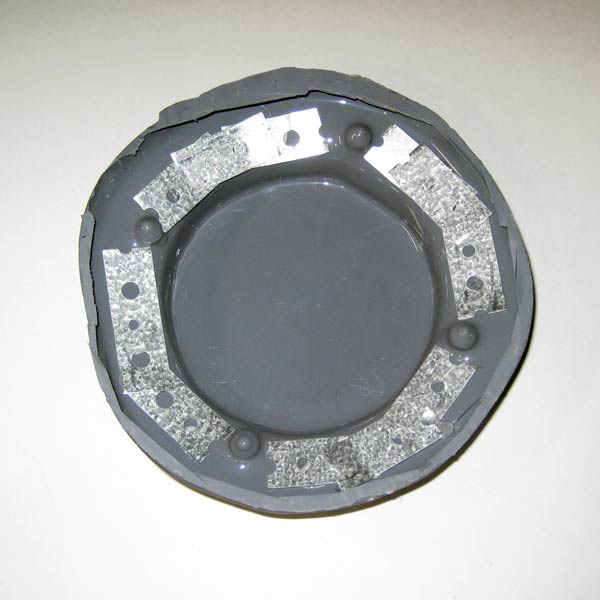
This is our older disk holder that I cut the bottom off to show how I install the metal. The older one had four bolt holes through the top, but the new one is smooth, so you can have metal go all the way around.
Attaching the holder to your costume.
So what do I do to attach this to my costume? (Older Style Disk Holder) I placed the disk holder on my jacket and marked each hole with a white pencil. I then drilled a hole in the leather jacket and ran the bolts through and put the nuts on. I dremeled the excess off and added a drop of hot glue on each nut to hold it in place.
New Disk Holder (with smooth outer ring) – To attach this to your costume, first you will need to superglue the nut on the inside of the disk holder. make sure that it lines up with the drilled hole. Paul often checks the alignment by screwing in the bolt so the nut dries in the perfect spot. We will be sending out a template for the holes in your costume. It is safe to make the holes a little larger than the bolt so you won’t have a hard time lining everything up. We recommend using washers to disperse the weight of the disk holder. Paul went so far as to cut out a slim piece of rigid plastic sheeting to act as a larger gasket.
** We will have more pictures soon!!
Products Used in this Article: